LAICA Users Manual
J.W. Fried


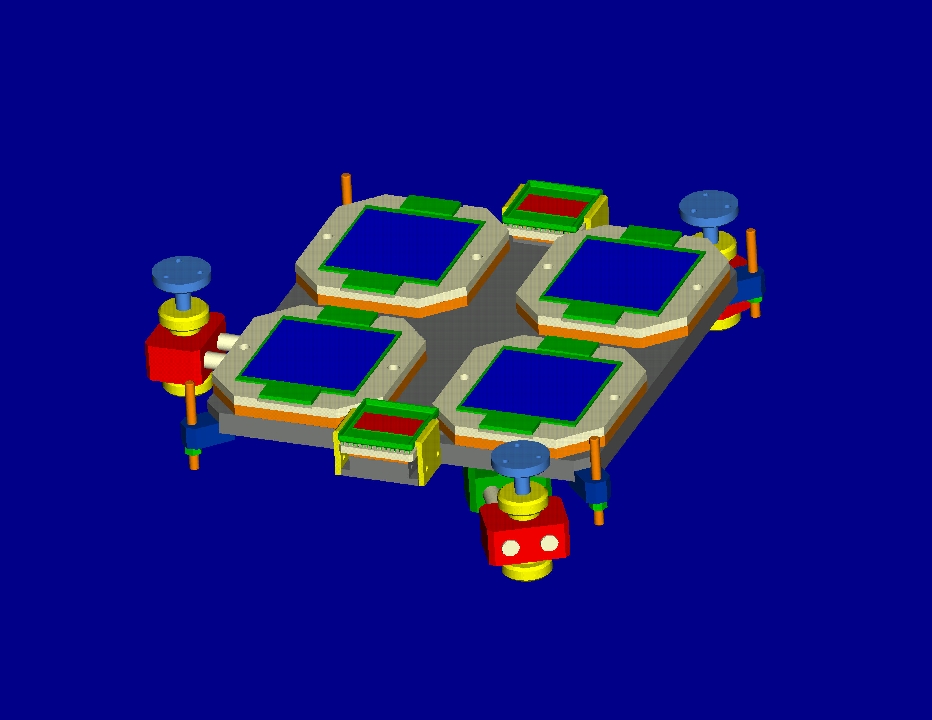
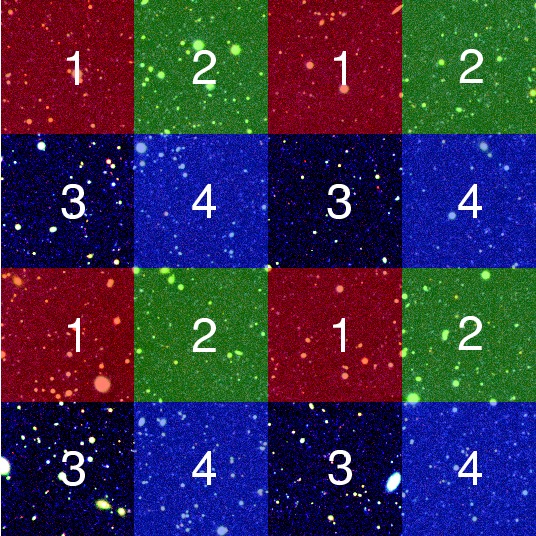
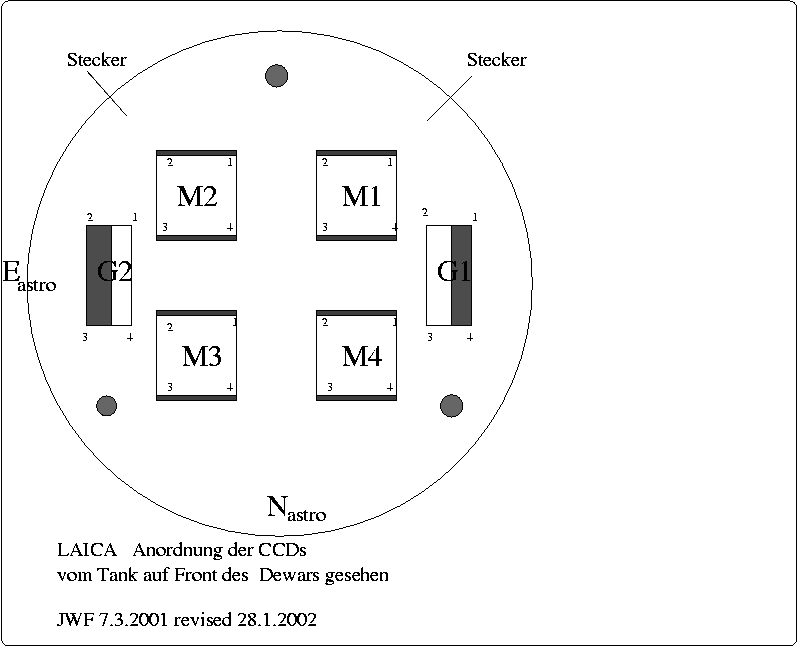
The arrangement of the CCDs is shown here as CAD image and a true foto here . In order to get a contiguous field, one has to fill in the gaps between the CCDs, i.e. 4 telescope pointings are needed for full coverage of a 1 square degree field (see illustration). There is a macro (@@ expose) to facilitate this and procedures to assemble a mosaic of the 16 images will become available (see here). The data are stored on disk in FITS format. Each exposure creates 4 files, one for each CCD. If the root of the filename you entered in the GUI is eg. JAN12 , and you have already 10 files on disk, the next exposure will produce files JAN120011_1.fits, JAN120011_2.fits, JAN120011_3.fits, JAN120011_4.fits for CCD 1,2,3 and 4, respectively. The numbering scheme of the CCDs is:
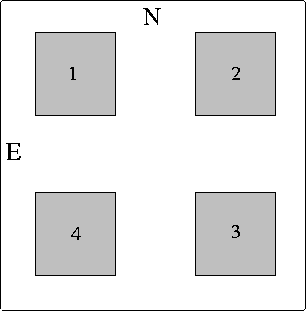
N is up, E is left on the frames.

To get this manual on-line click on the Help button in the GUI.
Note that the behaviour of the terminals is not equal (which it should be of course). The guider does not run properly on the dospan terminal, open it on one of the flat screens of PC o2k.
When you start your observing run make your own directory in the area given to
you by the local staff, eg. by
mkdir mydata
and change to
this directory by the command
cd mydata
. Make sure that
the correct path is entered in the GUI.
Now start three parallel MIDAS sessions (take care that they start on the same
area you are sending your data to!), one for running a receiver
which converts FITS to MIDAS, and another one for quick look of
the data and one for using some macros which facilitate use of the instrument:
In any case, it is a good idea to take domeflats for all the filters you want to use. To take a domeflat,
       Filter    exp. time

	1  U         60
	2  B         10
	3  V          3
	4  R          1
	5  I          1
	6  B2        10
	7  black is beautiful
	8  u'        30
	9  g'         5
	10 r'         1
	11 i'         1
	12 z'         1
The command @@ meter can be used to take a test exposure of a subarea of the CCDs and calculate the flux (ADU/second).
It is useful to expose more than one flat and dark 0, too. Series of exposures
can be easily obtained with @@ dark and @@ domeflat. For example, to take
three dark 0 and three domeflats in the R filter one can use
@@ dark 0 3 and @@ domeflat 4 1 3.
The command @@ prepflat can be used to compute a median dark0 and a
normalized flat. After flatfielding with skyflats the frames are flat to typically about 0.1%. The shutter of LAICA allows very short exposure times down to 0.1 second. For skyflats, the exposure time between 2 consecutive flats must be changed by a factor of about 1.2.
Example 1:
You want to take a mosaic on the field around NGC6240, exposure time
60 seconds. First point the telescope to the center of the field, then use
@@ expose NGC6240 60 1,4
to take 4 pointings. The order
of pointings follows the numbering used for the CCDs, i.e. starting from
position 1 = NE,2 = NW, 3 = SW to 4 = SE.
Example 2:
Clouds have interrupted taking the frames in example 1 after the 2. pointing.
To continue this sequence point the telescope to the center of the field,
then use
@@ expose NGC6240 60 3,4
to take the pointings 3 and 4.
Example 3:
You want to dither on each pointing. Use
@@ expose NGC6240 60 1,4 3,1
to take 3 dithered exposures on each of the 4 settings, starting at
position 1 in a predefined dithering sequence.
Before starting an exposure, expose will prompt for checking the auto guider.
If you answer "g", the shutter will open and the guider is set in full
frame mode (see next section guiding). Select a
guide star by clicking on it, and hit return in the expose command.
Start the exposure by entering "e" and "resume" guiding.
If you want to repeat one exposure during the sequence, you can do this
easily since expose prompts for repeating an exposure.
The program @@ gexpose differs from expose by the use of the guider. If you select a guide star inside the innermost red rectangle on the fullframe field, the guide star will stay on the CCD during the dithering sequence. After dithering, the program automatically starts to expose and guide. Should the guide star not be on the CCD during dithering, the program prompts for interaction.
U   23.40 +- 0.06
B   26.40 +- 0.16
V   26.07 +- 0.05
R   26.30 +- 0.03
I   25.16 +- 0.08
Use the exposure time calculator to determine exposure times.
The following commands are useful short forms of frequently used MIDAS commands:
Some of the laica commands produce sound output which is very helpful.
If you do not get sound ask the local staff or follow the advise given here.
The program @@ fcor can be used for flat field correction. It determines the bias from the overscan and corrects for it, subtracts the dark and divides by the flat field. It also checks that the filters in flat and science frames are identical.
Second step is to find the x/y positions of the astrometric standards on the CCDs. To this end the coordinates of the standards have to be projected onto a plane (generalized coordinates) and the distortion of the corrector applied. This gives coarse positions of the standards on the CCDs in a linear approximation of the WCS, offsetted by the pointing error of the telescope (the coords of the field center are read from the keywords of the data files). Let us assume that the ascii output file of the COSMOS data is 60942, and you want to treat the (flatfield corrected) data files 30-45. This is done with the command
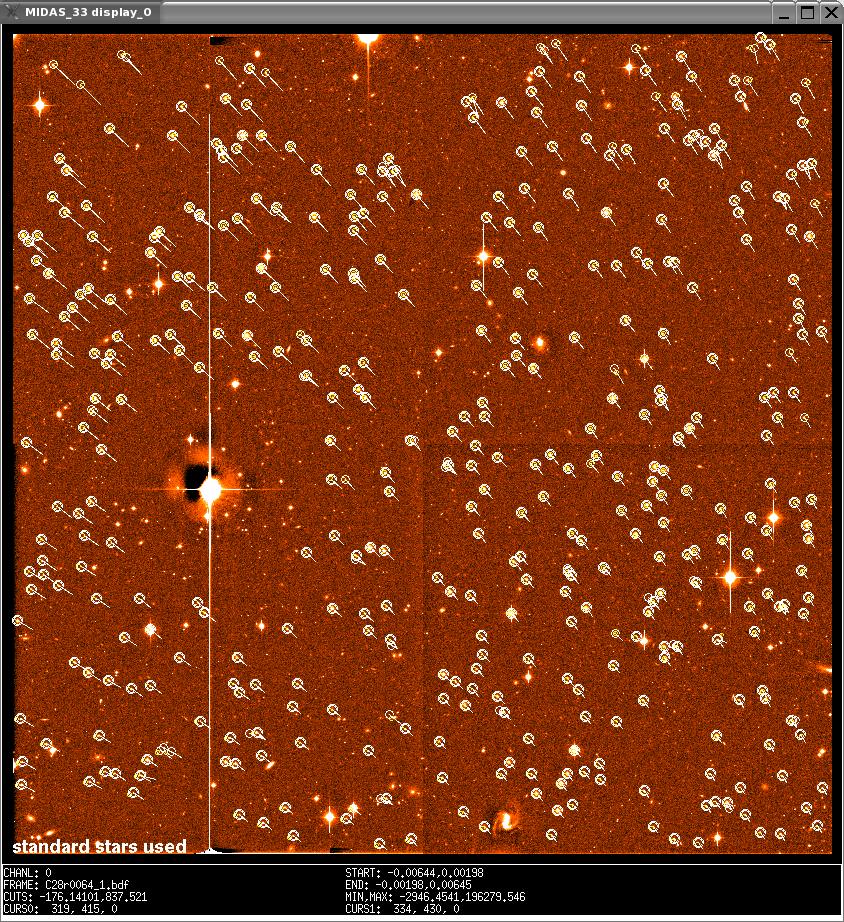
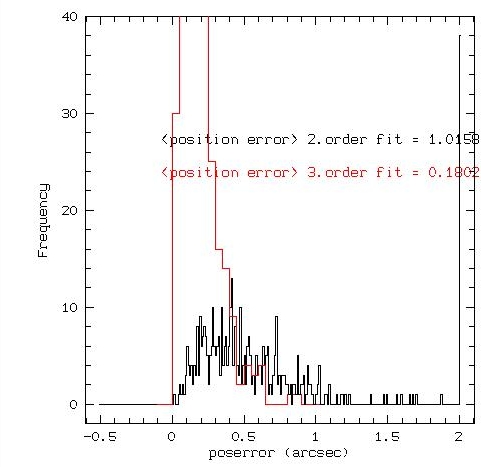
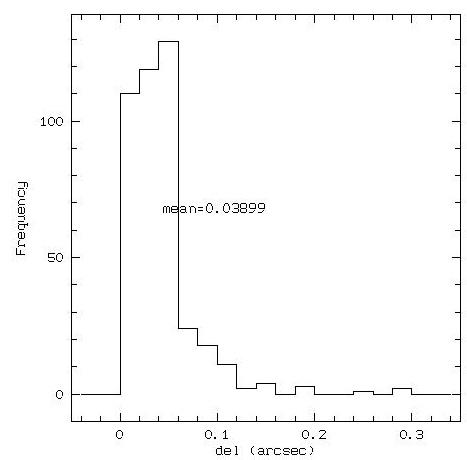
Third step is to compute the astrometric solution. SExtractor is used to find objetcs on the frames. The stars for which a match in linear WCS position and cataloge is achieved within certain tolerance are identified, an astrometric solution of 2.nd order calculated, stars for which the difference in catalogued and astrometric solution is larger than 1 arcsec discarded and a 3.rd order fit calculated. A typical result of this is shown here; the lengths of the arrows indicate the positions of the stars if there were no distortion. A histogram of the astrometrical errors here. Note that this histogram reflects the errors in the COSMOS data, too. Astrometric errors in the finally rebinned files are on the order of 0.03 arcsec as shown by this histogram of the differences in positions of medium bright stars on 2 frames. Computation of the astrometric solution is time consuming and done in batch mode
Finally the files are rebinned to RA/DEC and stacked. This too is done in batch mode. Example:
The 3-lens corrector causes noticeable pincushion distortion, i.e. a star
appears in the image farther away from the optical axis (which is in between
the CCDs). The distortion is well described by
dist = 10**(-4)*r**2
where r is the distance from the optical center in mm, and the distortion dist is
measured in %.
The front ring must not be tilted!
If the focus is 28.5 then the individual foci must be at the same value, i.e. Quicklook
The most useful standard MIDAS commands are (for more details use the
help command, e.g. help load/image):
The following special utilities are available:
@@ logsheet        to print observation logsheet(s)

@@ dark            to take a series of darks
@@ domeflat        to take a series of domeflats

@@ autofocus       to take a focus series
@@ focus           to evaluate a focus series
@@ meter           to take a test exposure and measure the flux in it

@@ standard        to take a series of a standard star field centered on all 4 CCDS
@@ center          to center an object on one of the CCDs
@@ expose          to take exposures (+dithering, offsetting)
@@ gexpose         to take exposures (+dithering, offsetting) with guider in automatic
@@ guidepix        to get or set the guidepixel

@@ seeing          to measure seeing on frames
@@ offset	   to offset the telescope
@@ postel	   simple catalogue routine
@@ shutter         to open/close shutter manually

@@ lload           to load 4 frames into display. Note that the cursor works only in CCD 1 !

@@ zoom 	   to zoom the displayed image around the cursor position
@@ prepflat        to prepare flats
@@ fcor            to do flatfield correction

@@ indisk          to read fits files from disk and convert them to MIDAS format
@@ intape          to read fits files from tape and convert them to MIDAS format
Detailed help information is given when entering help as first parameter
in a command, eg. @@ seeing help. A list of all available special commands is
obtained with @@ laica
show/comm gives you an overview of all user defined commands
Treating LAICA data
LAICA data are more difficult to deal with than those of many other instruments. They have to be calibrated
In the following we describe in some detail procedures which have been used successfully to reduce LAICA data.
Bias subtraction, flat fielding
The program @@ prepflat prepares flats from a set of dark0 and flat frames (domeflats or skyflats). It determines the bias level for the frames
it uses from the overscan area and computes a median average over several flat exposures which is the flat field. The flats are normalized to quadrant 1 in CCD 1.
Example: your file root is jan12, frames 1-3 are dark0 frames, and frames 4-6
are the flats in filter V. Then
@@ prepflat jan12 4,6 1,3 flatV12 dark12
will average the dark bias corrected files jan120001-jan120003, save the result as dark12_1 to dark12_4 and subtract these darks from the bias corrected flats, normalize and median average them. The result will be stored
as flatV12_1 to flatV12_4. An example of a flat field is shown
here.
Example: your file root is jan12, you have prepared all your flats and darks,
and you have 34 science frames starting at file #7. Then
@@ fcor jan12 7,40 flatV12 dark12 cor12
will correct the files jan120007_n to jan120041_n with the flats flat12V_n and dark_n and write the output to files cor120007_n to cor120041_n where n = 1 to 4. Astrometric correction
The distortion amounts up to 20 arcsec in the corners of the LAICA field. This effect is determined and corrected for by a full astrometric solution for each image.
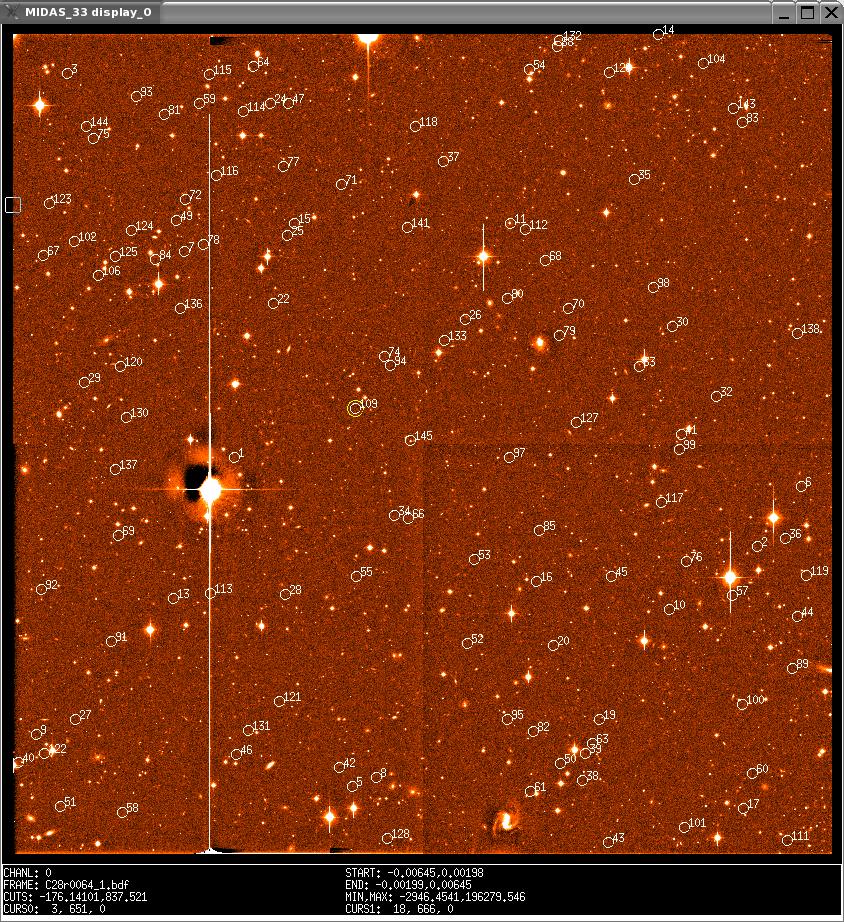
First step is to download an astrometric catalogue preferrably the COSMOS sky survey. Download the catalog as ascii file, do not delete the header.
@@ prepastro cor12 30,45 60942
This will first load image cor120030_1, prompt for a correction of the low/high cuts in the display, overload the coarse positions of the standards. The display looks like
this. The stars are numbered according to brightness to facilitate identification. You then have to select one star, enter its number, its coarse position is marked yellow and then click on it. The program determines a coordinate offset from this which is applied to all frames of the same pointing. The result is a linear WCS approximation. The program loops through all files, in the example 30-45. This step takes about 15 seconds per pointing and is done quickly even for a large number of frames.
@@ compastro cor12 32,44 60942
To check the astrometry the program outputs a table file astro.tbl with the most important info. The astrometry is of the polynomial type (RA=x0+A1*x+B1*y+A2*x**2+A3*xy+A4*y**2...) and stored as descriptors to the files.
crea/icat T.cat cor12*bdf
creates a catalog of files to process, in our example all files cor12*bdf with *=0030-0045. To rebin these to a frame with 16000x16000 pixels with RA/DEC = 22.65/41.00 degrees at pixel x/y=1/1 at a step size of 0.224 arcsec/pixel
@@ rebstack T.cat Gave ? ? 0,2 16000,16000,22.65,41.00,0.224
The program creates rebinned files (prefix reb) and stacks them to the output file Gave. Several stacking modes are available, such as average, median, and kappa/sigma clipping. (The meaning of all parameters is given in the help @@ rebstack help).
Photometric correction
If SDSS data exist for the field one can use these to correct photometry. Example:
crea/icat T.cat rebcor12*.bdf creates a catalog of rebinned files. The instrumental magnitudes are compared to sdss data and corrected by
@@ photcorr T sdss g 0 where g is the pass band. photcorr corrects the original flatfielded files, which now have the first character K, eg. Kor120030_1 and so on. These must be rebinned and stacked
crea/icat T.cat K*bdf
@@ rebstack T Gave ? ? 0,1 16000,16000,22.65,41.00,0.224
Saving the data
Since each frame has 142 Mbytes, one clear night will produce around 10
Gbytes. Save your data on DAT. To avoid hazzle with full DATs during observations, use a new
DDS3 tape for each night. To save the data as genuine FITS-files use the CA-script fitscopyx and to list the DAT use ccdlistx . To save the data on DAT in tar-format rewind the tape mt rew and copy the data
tar cv * . Be careful not to overwrite data; it is best to use a new DAT for each save! List the tape with
mt rew then tar tv > dat.list
Current Status (March 2006)
LAICA is up and alive!
The setup of the CCDs and the software, especially of the guider, has been improved.
The LAICA team
Appendix
Filters
The following filters are standard LAICA filters; if one of these is
used, any focus offset is automatically corrected for. The foci are
approximate, determined in poor seeing (2-3")
#   name       glasses            focus
-----------------------------------------
1     U    UG1/1+BG39/2            29.7
2     B    BG37/1+BG39/2           29.6
3     V    BG18/1+GG495/2          29.6
4     R    OG570/2+Calflex X       29.3
5     I    RG780/3                 29.75
6     B2   BG12/1+BG39/1+WG295/1   29.7
7     black is beautiful
8     u'   UG11/1+BG38/1+coating   29.6
9     g'   GG440/2+BG38/3+coating  30.3
10    r'   OG550/4+coating         29.9
11    i'   RG695/4                 29.9
12    z    RG830/3                 29.6
-----------------------------------------
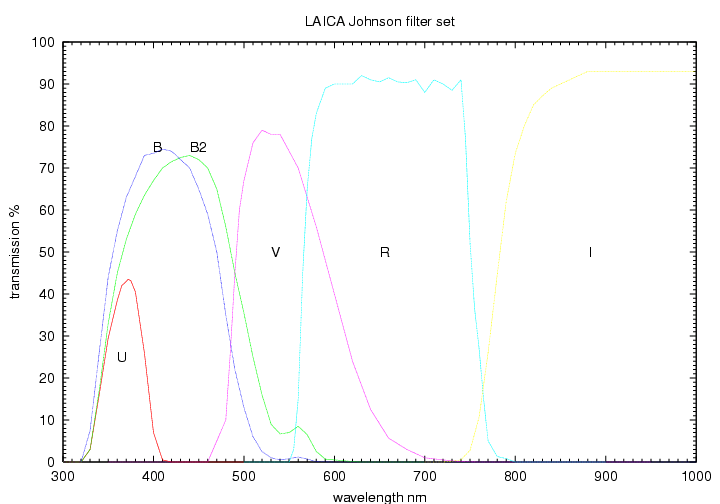
Transmission curves for the Johnson-like filters :
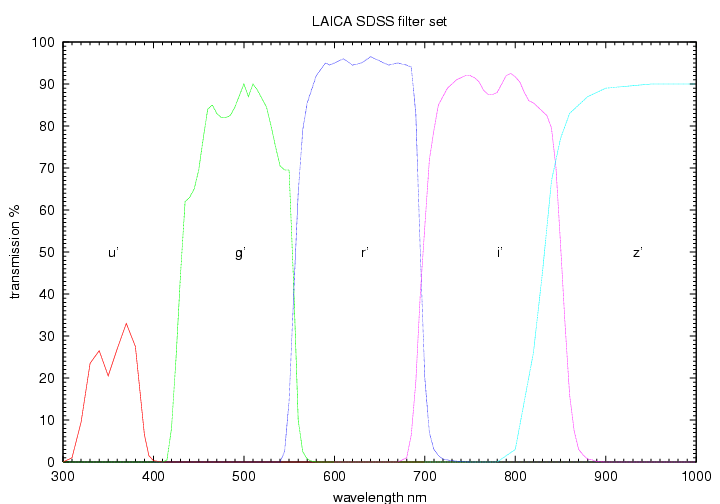
Transmission curves for the SDSS filters :
Transmission data as ASCII files:
John_U
John_B
John_B2
John_V
John_R
John_I
SDSS_u
SDSS_g
SDSS_r
SDSS_i
SDSS_z
Install a new filter
To install a new filter (to be done by the local staff only!), open the filter
magazine's back door, take off the aluminum plate, take out the filter holder,
put in the filters for the science and guider CCDS, and put the filter holder
back again, close the filter magazine.
Determine the focus for the new filter, calculate the offset to filter R
(focus new filter - focus R) and edit the filter list
/CalarAlto/etc/laica.xml.
Shutter uniformity
The shutter is of the focal plane type, like in an SLR camera
(the german Schlitzverschluss describes it very well).
Non-uniformities as derived from flats are on the order of 0.1% for exposure times
down to 0.3 sec. Click here for an illustration of
shutter effects (shown here are the ratios of flats with different exposure
times).
The CCDs
The CCDs are of the 485 type delivered by a company which in
February 2002 was called BAE (formerly Lockheed Martin).
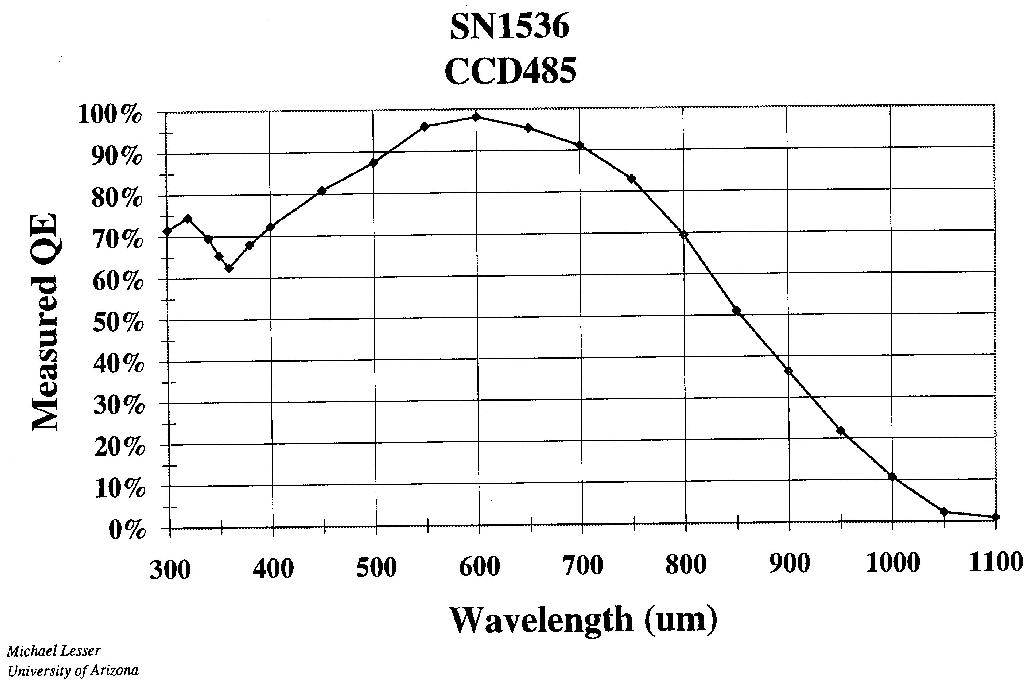
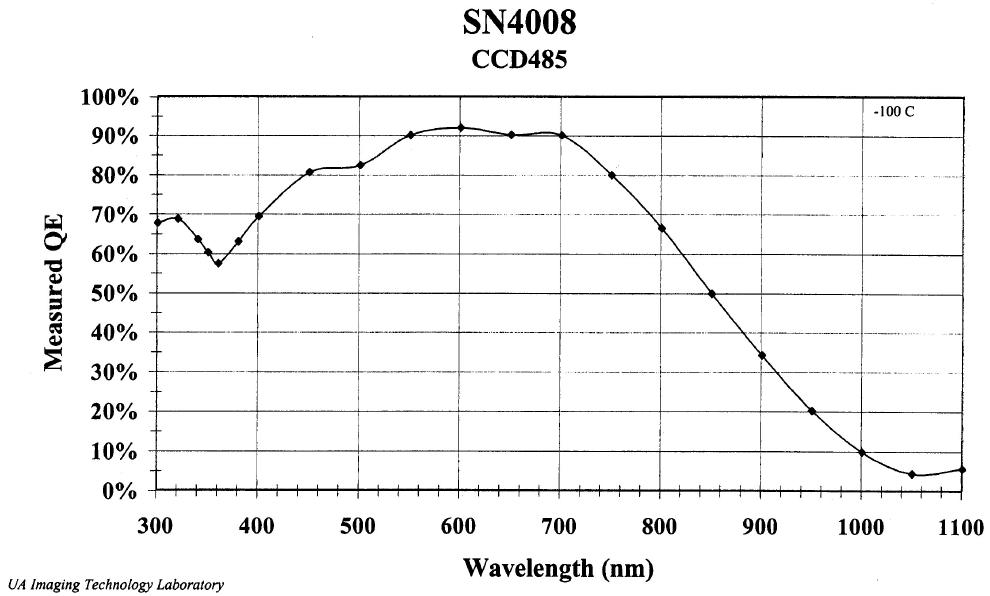
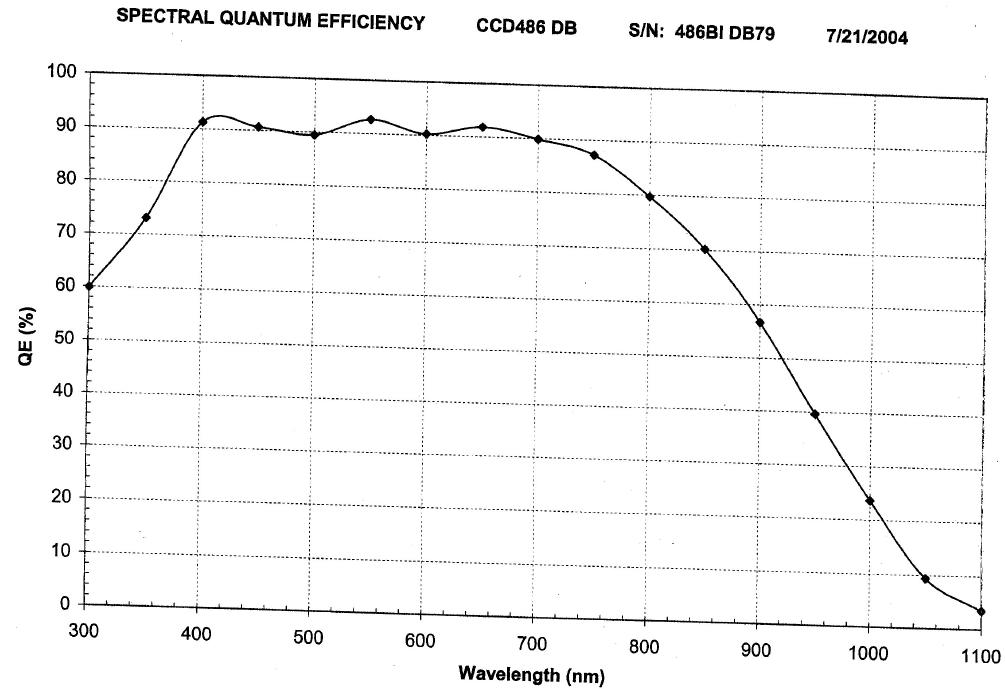
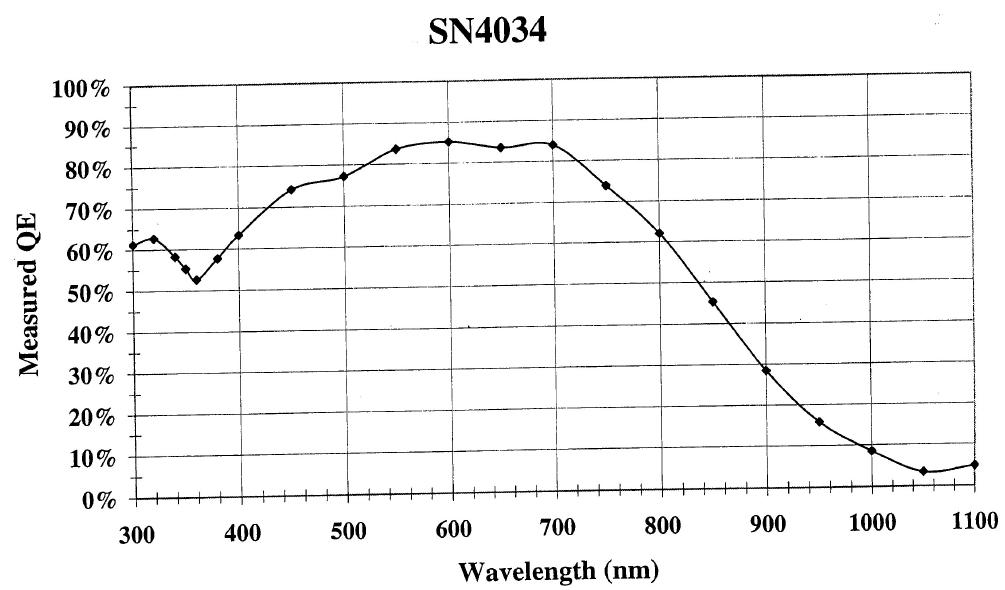
The serial numbers of the CCDS are M1=1536, M2=4008,M3=486BIDB79,M4=4034.
The quantum efficiencies as measured by the manufacturer are given here for
M1, M2, M3 and M4.
Great care has been taken to set the DC offset and
sensitivity (electrons/ADU) equal for all quadrants within each CCD. M3 has been set to give the same signal in R than the other CCDs.
The basic parameters as measured in march 2006 are listed below.
RON means read out noise in electrons, sens the sensitivity (electrons/ADU).
CCD1 is from a different charge and has a higher read out noise. The numbering scheme for the quadrants is
the same as for the CCDs themselves.
LAICA CCD Parameters measured in march 2006


Sequence ccd        quad       ron        gain
 -------- ---------- ---------- ---------- ----------
        1         +1         +1      13.08     +1.558
        2         +1         +2      14.65     +1.587
        3         +1         +3      11.79     +1.499
        4         +1         +4      12.41     +1.596
        5         +2         +1       6.04     +1.530
        6         +2         +2       6.37     +1.519
        7         +2         +3       7.54     +1.507
        8         +2         +4       6.40     +1.592
        9         +3         +1       4.15     +1.242
       10         +3         +2       5.30     +1.190
       11         +3         +3       4.14     +1.203
       12         +3         +4       4.53     +1.258
       13         +4         +1       7.14     +1.597
       14         +4         +2       6.17     +1.627
       15         +4         +3       7.43     +1.577
       16         +4         +4       5.31     +1.572
 -------- ---------- ---------- ---------- ----------


RON  in electrons     sens in ADU/electron
One can easily measure the CCD parameters using @@ ccdpars. This command
needs 2 dark0 frames and 2 flats with the same filter and exposure time; @@ sens is a convenient way to get the 2 darks and 2 flats. The CCD parameters are then calculated by eg.
@@ ccdpars flat1 flat2 dark1 dark2
For each quadrant the CCD parameters are evaluated using the formula given
by Janesick
               (mean(flat1)+mean(flat2)) - (mean(bias1)+mean(bias2))
       sens = -------------------------------------------------------   [el/ADU]
                      sigma(flat0)**2 - sigma(bias0)**2

               sens * sigma(bias0)
       RON  = ----------------------  [el]
                   sqrt(2)
where flat0=flat2-flat1 and bias0 = bias2-bias1. The parameters are stored in a table and an ASCII file sens.
Distortion/Coma
Coma arises from a tilted primary mirror and/or decentering of the telescope.
The Calar Alto personnel checks the alignment of the telescope regularly to ensure
high image quality.
 Trouble shooting
 The sky is cloudy
The midas receiver does not convert the files
No sound
Some LAICA MIDAS commands are producing sound output. If you do not get sound
then either the volume of the speaker may be turned off, or the speaker is
not connected, or the headphones are not selected as output. In this case,
start the audiotool and select headphones as output (play button). If this
does not help, ask the local staff. Connection to read out electronics is shaky
Installation Notes
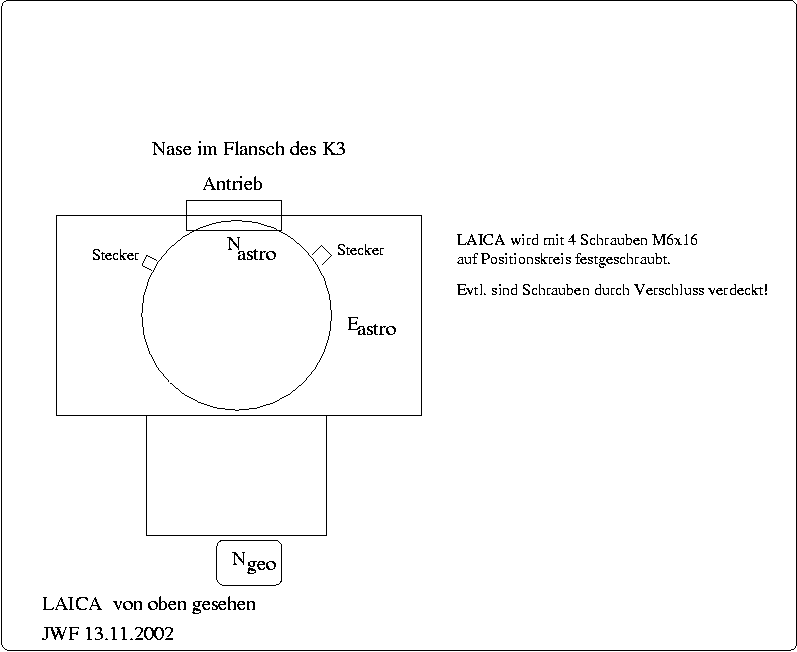
Mounting LAICA to the frontring:
See the following foto.
A schematical drawing is shown here , and
the arrangement of the CCDs as seen looking onto the dewar is
sketched here , as seen from the sky
here .
FOK E = 28.5
FOK W = 28.5
FOK N = 28.5
FOK S = 28.5
These values have been determined in October 2003.
These values must be checked after installation of the frontring.
To check the actual values enter
Wahl1 -> FOKSW
Wahl1 -> FOKNE
To change these values enter
@KIPPSW value CNTRL A -- tilt at SW axis
@KIPPNS value CNTRL A -- tilt at NS axis
Pointing
To verify the pointing, select a PPM star, use
@@ center 1 to move this star on CCD 1. Load image of CCD_1 into display.
If the star is not in the center, use @@ offset 2100,2048 to measure the
offset to the center. Turn off the main drives, correct offset with
@KORPAR_T_NULL
@KORPAR_D_NULL
by subtracting the measured RA offset but adding the measured DEC offset
to the values which are stored in KORPAR. Start the drives. Note that
these values change each time the telescope computer is turned off!!!
Parameters in October 2003: -256 / -89
Communication with filter/shutter electronics
only for staff on Calar Alto!!
telnet flotest 951
?S status
?E010 exposure 1 second
?F3 put in filter3
For a list of commands see the little laica manual by H.Unser (should be in
the LAICA closet on the second floor).